

My coloring process, Not a tutorial because those take way too long to make sob.
well I hope this gives you a little but of an idea as to how I color : )
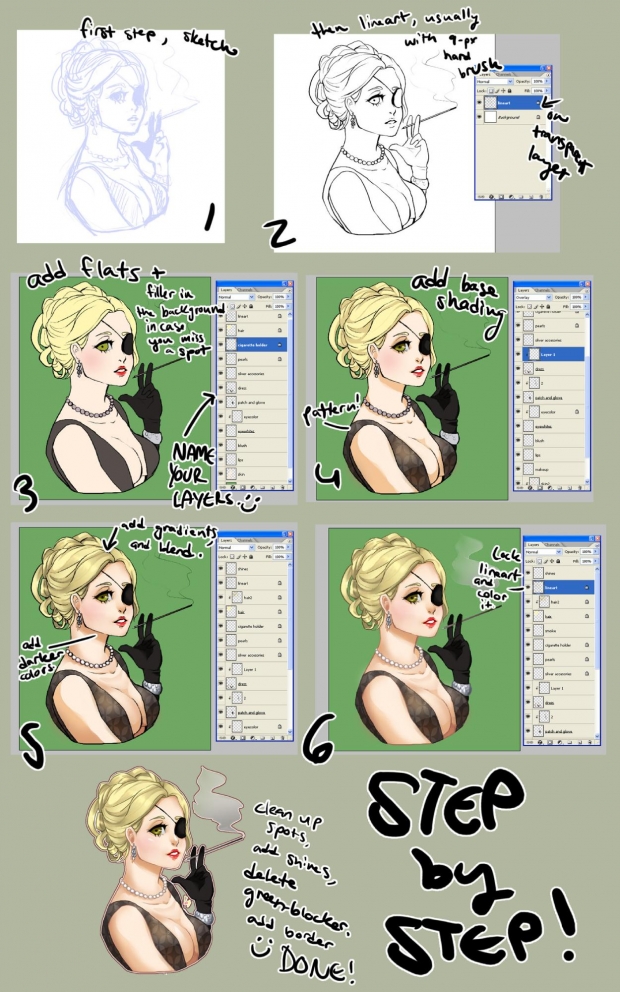
STEP 1, I sketch using a light blue directly in photoshop (sometimes I scan, but only when my scanners working).
STEP 2, I use a hard round brush in black to go over my lines on a seperate layer. I usually use 5-9px size brush, but on more HQ pieces (like 'Friends' or 'Petals and Cream') I use size 3px. I also go over some of the edges with the eraser tool to make them sharper (like eyelashes and the tips of hair)
STEP 3, I created different layers for each item in the picture, with skin on the bottom. I lay down the base color using the magic wand + expand tool (too fill in under then lineart so there isn't any white spots) and then I use fill. : ) I like doing this hahaha. ALSO ADD A UGLY COLOR TO YOUR BG SO YOU CAN TELL WHEN YOU ARE GOING OUT OF THE LINESSSS.
STEP 4, I create layers using the 'use previous layer as mask' tool so I can't color outside of that item. I lay down the base shades to establish a light source using hard brushes, and erasing some edges with a soft eraser.
STEP 5, I use the select tool (looks like a lasso) and then I overlay very transparent gradients inside the selected area.(gradient are like...colors that fade into another color, but you can do it with a color--->transparent so it looks smooth) then I use a big soft brush, the softest the brushes will go, and I use the lightest ton I used for that area (say, for the skin, I picked my base skin tone used in step 3) and I lightly go over some of the edges of my sharp shadow areas. I repeat with the different shades I used, and I keep on adding gradients~
STEP 6, I lock the tranparency on the lineart layer, and color it~
STEP 7, Add shines, delete the ugly green bg so its transparent. Add a border to the drawing, and add watermark (little cherries and a thunderbolt! get it? cherry shock...) AND YOU ARE DONE.
Does that help, or not make any sense >__< ?
JPG killed it , here is a link to the DA one.
http://cherrishock.deviantart.com/#/d2wt31y


