Process of Little Angel artwork By:MangaKid
Title: Little Angel
Medium: Copic markers on Borden&Riley 9"x12" rag marker paper (Traditional)
Time from start to finish: Two days. (Jan 22-23 2012)
This doesn't really show in detail how I created this, but I'll try to explain as best as I can and I hope you find it interesting :)
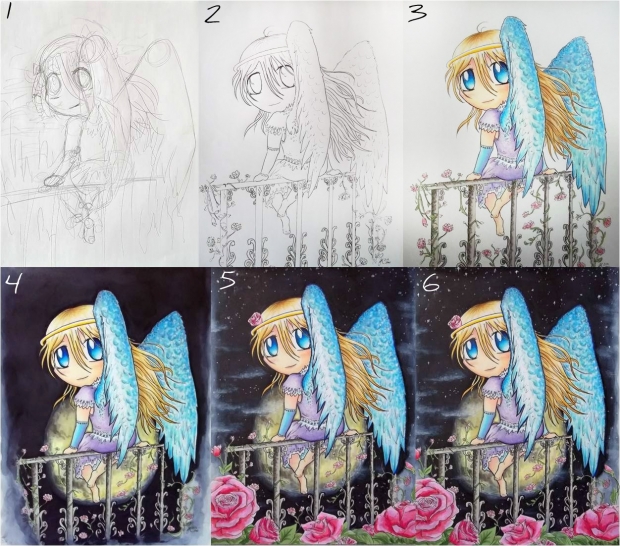
1. Okay so in the first picture, I very roughly sketched my idea on a piece of scrap printer paper. You can see that its just a general idea/guideline sketch. I actually changed the positioning of her feet a couple of times.
2. After the first sketch that gets my rough idea out in paper, I sketch it softly onto my marker paper. Right after that, I go straight to inking. I ink with Copic multiliners. With help from the original guidelines, I know what to follow and what I should add or play around with when inking. For example, you can't see the feet in detail in Step One, so during the inking step I make sure to add the feet. Also, I fixed the eyes from the sketch in the ink stage. Its somewhat perilous as one mistake can mess it up but it helps me to learn and develop even more. The angel really starts to take shape as I add the ink.
3. Now to colour the angel! This part alone took me approx. 4 hours. When colouring any part of my art, lighter colours go on first before I add the darker colours. I'll list the Copic colours I used in this stage (just for the sake of it xD):
SKIN- E51(milky white), R20 (blush), YR00 (powder pink), R81 (rose pink)
HAIR- YR31 (light reddish yellow), E33 (sand), YR23 (Yellow Ochre), Y28 (lionet gold), 0 (colourless blender)
DRESS- BV00 (mauve shadow), BV02 (prune), BV13 (hydrandea), V01 (heath), V12 (pale lilac), V17 (amethyst)
WINGS- B00 (frost blue), B12 (ice blue), B24 (sky), B29 (ultramarine), BG01 (aqua blue), G00 (jade green), C-1 & C-3 (cool greys)
RAILING- C-1 (cool grey), W-1,3,5,7 (warm greys)
ROSES- YG63 (pea green), YG67 (moss), G82 (spring dim green), RV02 (sugared almond pink), R20 (blush), R22 (light prawn)
MOON- YR31 (light reddish yellow), Y00 (barium yellow), cool greys and warm greys
... Ok perhaps that was a bit much. But maybe it'll help if any of you want to buy good copic marker colours!
4. Here, I added a background. To tell you the truth, the moon didn't even start as a moon... it was just supposed to be a glow. I was also going to try for a city or country background. Multiple times, I freaked out cuz I thought I had messed up. Usually I'm confident enough that if I make a mistake, I just continue and try to use that mistake to my advantage. But with the background, I can honestly say I didn't really know what I was doing xD
And that led me to some experimenting! To colour the background evenly, I chose to pour the Copic ink straight from the bottle onto the paper and spread it as much as I could with my finger (which is still black xD). Down the sides, I dripped different tones of grey. One time, a drip actually starts travelling down the wing, but my trusty colourless blender fixed that up! I also used colourless blender ink to take away any streaking in the background.
5. This is pretty much the finished artwork. I added the stars and clouds with Sharpie paint. The clouds I smudged on with a sponge and my finger. For the roses in the front, I had to do some cutting and pasting! On a separate paper, I drew and coloured the roses and then pasted them into place.
6. Finished! Just a few touch-ups such as making some stars brighter and adding a bit more colour. I hope you all enjoy Little Angel^^
Sorry for the loooong explanation! Thankyou if you read it :D I hope it was interesting and/or helped you out! Any questions or advice are appreciated.
Catch you all later! I'm on wifi right now so I'll reply to comments later. Thankyou! <3