Hey! This is MangaKid!
Lol so its about time that I got a couple of my own tutorials up^^
Thanks to Pramod aka ekaknr who asked me to do my own Copic colour tutorials. These posts will be in his Artist Cafe as well.
If you want to learn more about Copics, click HERE!
I've spread this tutorial over two posts. (post two will be posted later!)
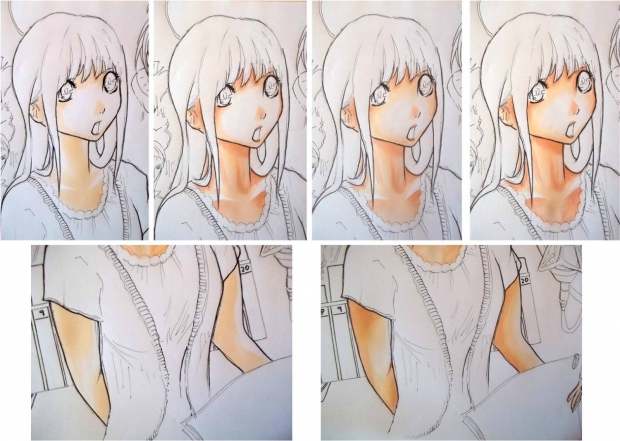
Its based on 'Our Dream' drawing I did for Panou's 'Its Ok to Cry' challenge. The nice model is Azuki Miho, referenced from the cover of Book 4.
The steps are explained going from left to right starting from the top.

So its good to start by colouring the skin first sometime!
I always start by colouring with light colours. The colour I use first is E51 (milky white) and the colourless blender to smooth it out and lighten it even more. TIP: Using the white of the paper for highlights is a neat idea too!
It starts by looking a bit patchy.
Then I added E11 (Barley Beige) for the shadows. Going over the shadows with E51 or the colourless blender will smooth it.
In step 3, you can see that her face is less white and more coloured. To get the softer colour, its important to use the colourless blender (aka CB). Sometimes I put down the ink from the CB first and the go over with E51. Since the paper is wet, its easy to move the ink around. And since the blender is clear, it works to blend the skin into the paper. Ugh so hard to explain... It really takes experimenting and experience^^
In the last stage, I added a YR00 (powder pink) to darken the shadows and went over with E51, E11, and the CB.
NOTE: It looks like the paper on her neck is wrinkling a bit. Lol I din't know why but it wasn't caused by the markers, I probably sneezed or something xD. Copics work very well on marker paper and don't wrinkle the paper.
Same idea with the arms... Lighter colours and then dark. Blend the dark with the colourless blender or the original light colour.
Hope this is interesting and helps! Definitely try out Copics if you can!! :D
If you have questions, let me know by PM or comment!
-MangaKid