Squares of Death! How to Survive the Killer Realm of the Checkered Board!
Checkers is an old and depending on your other alternatives, a somewhat fun game. The rules are simple, two players, twenty four pieces, and sixty four squares to do battle over. Jump over your enemy's pieces to capture 'em or die trying. Sounds simplistic enough, right? Wrong! Many are the people who have some degree of difficulty with this game (Or so I assume). Whether it be falling for a trap or getting pulverized within five minuets, we can all use a little improvement. So, without fervor delay I bring you Squares of Death! How to Survive the Killer Realm of the Checkered Board!
Strategies for a successful start:
Getting your opponent to move first will make the game easier. While it gives them the first step on the path, it allows you to set traps along it.
When starting a game one should always move defensively. Starting out with an attack may earn you first blood but will often result in leaving your pieces unfortified. Start the game calmly, try and lure your enemy to attack first then counter attack.
Mimicry works well when starting a game, simply mirror your opponent's moves for the first three turns. Doing this tends to psych 'em out and put them on the offensive. However, one should make sure to fortify their advance while doing this. Always try to have a piece behind a piece, otherwise your opponent will jump you and break free of the potential trap.
Don't move your rear line. It may be tempting to if you're taking an early beating but realistically you shouldn't move it unless you absolutely have to.
Kicking things up a notch:
Once the beginning is over and done with you have to turn up the pressure. This is when your tactics should shift from defensive to offensive. Doing this should earn you a couple of pieces, but expect it to be mostly tit-for-tat the first three jumps. But don't be discouraged. If you fortified your positions during your advance then the enemy will still be trapped within its own territory.
With any luck your enemy will move his or her rear line by the fourth jump. This is when you attack! Show no mercy as you send out a single piece to the enemy homeland for a crown. Once you have a King you can start jumping 'em from within. However, should they not move the rear line; you should continue your advance cautiously. They might be planning a counter attack to break through your lines, so remember to fortify your pieces as you advance.
If the enemy somehow manages to break through your lines then you should focus on getting a king with a minimal loss of pieces. The more pieces you have, the more potential kings in your arsenal. You will need at least three to successfully make a reverse sweep after the charging enemy hoard, so don't make any potentially devastating moves unless the outcome works in your favor.
The killing blow:
After the loss of eight or more pieces your enemy will likely try to skirt his way to your kings' row along the edges of the board. When this happens you shouldn't be too concerned. Leave your row as it is and pursue him with your king. Make more kings if you can, too. It won't take long to surround the remaining enemy forces and eliminate 'em from either the front of behind.
If they broke through your line earlier then it's more or less the same principle. Trap your foe in an unwinnable position and pick off his men one by one until he's either defeated or surrenders without terms.
Piece positions:
For these three positions you should reference the image below.
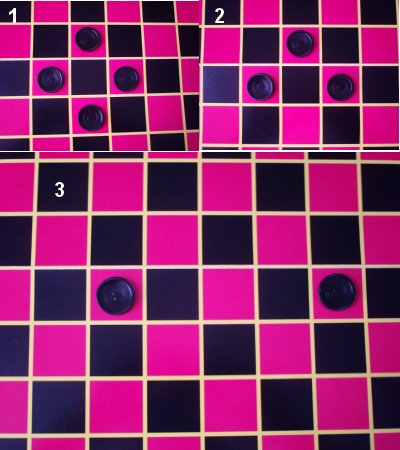
1: The Fortress.
This piece configuration is one hundred percent unjumpable. If you can, try to set one up in the center of the enemy's territory. It will limit their movement while giving you the ability to jump 'em whenever you please. Though once you jump you're no longer invincible, so only jump if it's advantageous. If you can, have some pieces lined up behind you to take 'em out for you.
2: The Arrow.
The one is mostly for offensive use. Your enemy can jump you if they get close enough but you will probably jump 'em before that happens. This form is also vulnerable when advancing. As such, you should only advance when the probability of immediate attack is low.
3: The Sentinels.
While small in number, this one is highly effective for offensive and defensive use. With this one you don't move, you wait for the enemy to come to you. If you set it up right then your foe won't be able to pass the line without coming into your jumping radius.
And that's about it, more or less. With any luck your next game will be more successful.
Yoji.