Welcome to Lea-chan's Ultimate Guide to Creating!
There's many worlds up on theO telling you rules about theO. Such as, wallpaper sizes, e-card sizes, what is allowed, what isn't. But sometimes, when you're ready to create something, you realize- you still don't know how to create those things! That's where this world will help you in.
To people coming here to learn to create:
Most of the tutorials here will try to keep things simple. There may be tutorials that apply to more than one item. Such as e-cards and wallpapers. Refer to the post's title to see what the tutorial may apply to.
My tutorials will mainly be for e-cards and wallpapers. For those who would like to learn how to improve their artworks and whatnot, you can visit my friends' world right here: OMG CLICK ME!
If you have a certain request for a tutorial, you may comment in my guestbook, send me a message, or comment somewhere here on the world. :)
To people coming here who already have the skills:
Want to share some of the skills with the beginners at our art? You can contact me by posting a comment onto this world or messaging me asking to be a guest poster! I will tell you the rules and how it works on the world before adding you. :D
*Please give credit to this world on your creation if you used this to make your wallpaper/e-card* (lol, advertising :D)
Table of Contents
Wallpapers
1. Images
2. Text
3. Layers
4. Textures
E-cards
1. Images
2. Layers
3. Textures
4. Eliminating Large Spaces
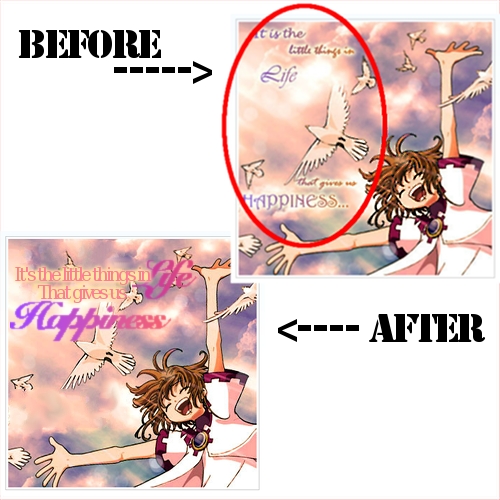
In the above picture, I took someone's e-card (with their permission). They had asked about how they could improve their e-cards and my next few posts will be on tips to improving them.
For this one, the scan is beautiful, and the color and typography of the words are great. The only thing? Try less spacing for the words. Put all the words together as shown in the bottom picture. This way, the person who receives the card can see the message without having to move the eyes too much. It's also easier to focus on the different parts of the picture.
Stay away from separating words that much. Keep them all together. It's best if you use them to form a sort of rectangle.
Quick overview:
[x] Don't space out the words on an e-card too much.
[x] Have the words form a sort of rectangle.
Alright, so I've covered most of the basics for wallpapers and e-cards. Maybe one more tutorial for e-card. Other than that, I'm running out of ideas on what people may need tutorials on.
So, if you need any help on anything, no matter how stupid it may seem, feel free to post a comment asking for help! You can ask anything from how to determine a text's size to how to choose a color scheme. Mmhm. If you don't ask, I'll never know! So, ask away!!
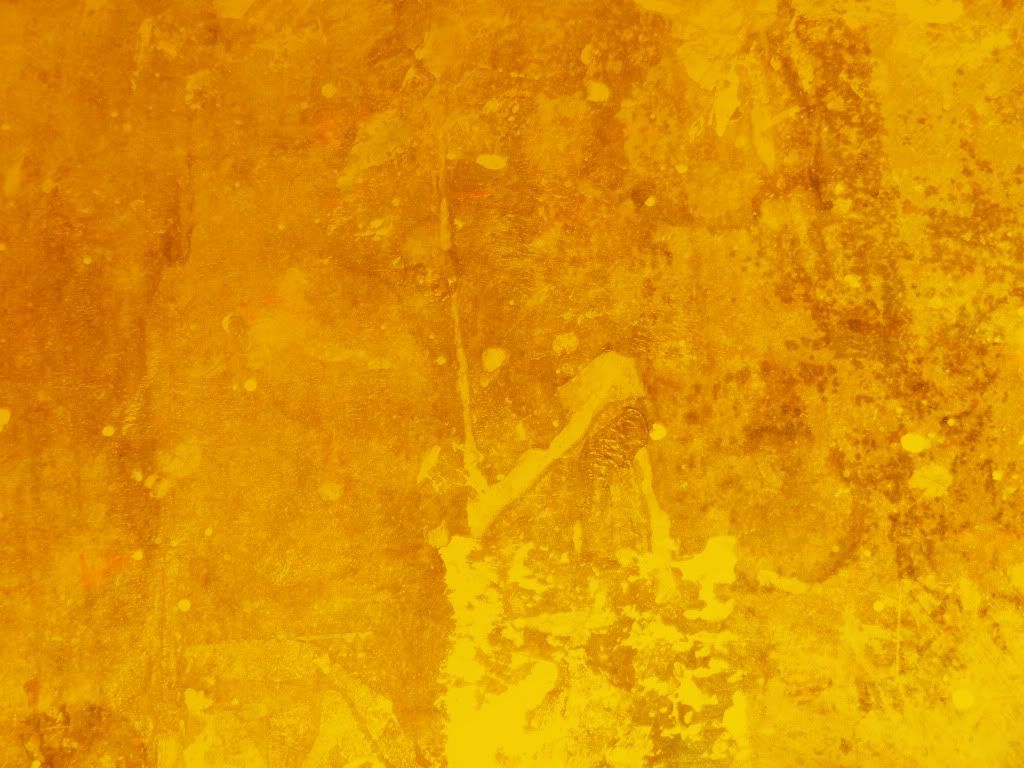
So how do people change the whole texture of their wallpapers or e-cards? They use certain images to create textures. So what kinds of images create textures? What kinds of textures should you use?
Above, I've included one example of a texture. A texture can cause changes to the light and color of a scan. They can also cause a scan to look older, shinier, and more. They are what make each wallpaper/e-card look better than their scans.
Remember the previous post on layers? That's what textures use. First, go on google or devianart and type in what kind of texture you'd like. Are you making a sad card? Search up textures like "old paper", "grunge", etc. Are you making a happier one? Search up things like "bright texture". You can also search up certain shapes for your scan or color such as "red texture", "butterfly texture", "blurry texture", etc. Save them as images.
Go back to your program whether it is GIMP, Photoshop, or whatever. When you've finished choosing what part of the scan you'd like to use, add the image/texture you'd just saved as an image and open it up as a new layer. From there, you can choose effects from the layer. My favorites are "overlay" and "screen", but play around with it until you find a perfect one. (I believe there's different ways to find these buttons for different programs, so if you need help looking for these functions, look it up on Google)
Sometimes, you won't be able to find the perfect texture right away. That's fine. Look at other people's wallpapers. Sometimes, they contain links to where they got their textures from. You can save those and use them later on. As long as the image doesn't have actual drawings on them, and is just like a little design, you can use the image as a texture. I recommend also keeping a folder in your computer marked as "textures" where you can store all these images.
Have fun!
Quick overview:
[x] Textures can be found on Google and devianart.
[x] Just save the "texture" as an image, and use functions such as "screen" and "overlay".
[x] As long as it is a design of some sort, the picture can be used as a texture.
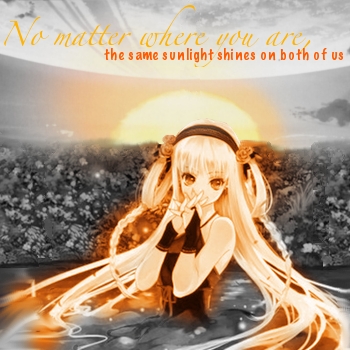
[The above image is an e-card I had worked on, but then dropped 'cause it looked a bit ugly. :P]
One of the most important things to know about for wallpapers and e-cards is layers.
How do layers work?
My favorite way to explain this is to imagine each layer as a sheet of plastic. When you draw different things on each plastic sheet and place them above each other, some parts can be seen, and others can't, right? There's some parts that are transparent, which allows you to see what's below it. That's the same as how layers work.
Layers for wallpapers and e-cards are used for many purposes. It's used to create the texture, to edit the picture, to crop one picture and place it on top of another, etc. When making a wallpaper, one may use up to 20 or more layers (depending on how complicated the wallpaper is). When making an e-card, it usually takes maximum of about 10 layers, unless if you're putting together many images onto 1 e-card. In the above e-card example, because I edited it a lot, it used about 11 layers.
Ok, so you may be wondering why I made this tutorial although it doesn't show the use of layers. It's just to get you to understand the basics before I go off to spinning about textures, cropping, and whatnot. You may get lost if you do not fully understand how layers work. :D
Quick overview:
[x] Layers work like plastic sheets of paper.
[x] Layers are important to create textures, edit a picture, or to crop and place one picture onto another.
[Some of you may recognize this e-card as one that I've posted onto theO before.]
I remember when I first started making e-cards (before I made wallpapers). There were a few questions that I had.
Where did the images come from?
Did the people draw it?
But then again, there're links...
So then what kinds of websites should I get the images from?
Google doesn't have that many good images....?
When you're first starting off, I'd recommend using minitokyo.net. It has images from practically all animes and mangas. You can also search up a color and it'll give you things related to that color.
Now, after you've found your image, check to make sure IT IS NOT A WALLPAPER! Using a wallpaper to make your own wallpaper/e-card is considered using someone else's creation without having their permission. I've gotten 2 e-cards removed from theO because I did not know this.
So what can you use? The scans. After searching on minitokyo.net, click on the scans tab. It should be on the right side of the webpage. Anything from there is allowed to be used.
When making a wallpaper, don't just save the image right off. Get the image to its full size (it should cover your whole computer's window) and save that. Otherwise, when you make your wallpaper, the image will become blurry!
So, that's about all the tips for this section. A quick overview:
[x] Images from minitokyo.net are great for wallpapers and e-cards.
[x] Make sure your image is a scan and not a wallpaper. Wallpapers on minitokyo were created by its users. (Therefore, are copyrighted)
[x] Save the full size image, not the little preview one!