

FULL VIEW .. AND LOTS OF TXT AHEAD
go to
http://shunshuu-tsunami.deviantart.com/art/Copic-Marker-tutorial-100456860
to see it in its normal format X3
This is wat it says in the rly small font O_O
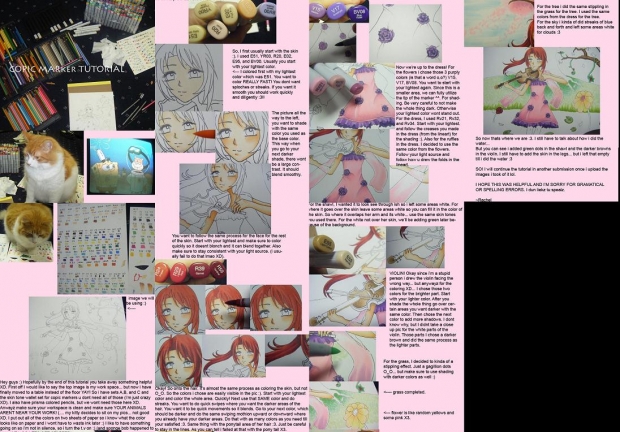
Hey guys :3 Hopefully by the end of this tutorial you take away something helpful. First off i would like to say the top image is my work space.. but now i have finally moved to a table instead of the floor yay! so i have sets a, b, c and and the skin tone wallet set for copic markers u dont need all of those i'm just crazy.. .lol I also have primsa colored pencils, but we dont need those here. Anywayz make sure your workspace is clean and more sure your ANIMALS ARE NOT NEAR YOUR WORK! (my kitty decides to sit on my pics.. not good...)... I put all of the colors on two sheets of paper so i know what the color looks like on the paper and i wont have to waste ink later :3 I like to have something going on so i'm not in silence so i turn on the t.v (and spongebob happened to be on :3). So lets get started.
So I first usually start with the skin. I used E51, YR00, R20, E02, E95, and BV00. Usually you start with your lightest color. I colored first with my lightest color which was E51. You want to color REALLY fast! You dont want sploches or streaks. If you want it smooth you should quickly and diligently :3!!
The pic all the way to the left, you want to shade with the same color you used as the base color, this way when you go to your next darker color there wont be a large contrast. It should blend smoothly.
you want to follow the same process for the face for the rest of the skin. Start with your lightest and make sure to color quickly so it doesnt bloch and it can blend togehter. Also make sure to stay consistent with your light source. (i usually fail at that lmao X3).
Okay so onto the hair! It's almost the same process as the skin but not lol. So the colors are chose are easiliy visible in the pic. Start with your lightest color and color the whole area. Quickly! next use that SAME color and do streaks. You want to do quick sqipes wher eyou want the darker areas of the hair. You want it to be quick movements so it blends. Go to your next oclor, which should be darker and do the same swiping motion upward or downard wher eyou already have your darker areas. Do that with as many colors as you need till ur satisifed :3. Same thing with the ponytail area of her hair :3. Just be careful to stay in the lines as you can tell i failed at that X3..
For the dress! The flowers i chose V15, V17, and BV08. You want to start with your lightests again . Since this area is the smallest... we can fully utilize the tip of the marker ^^ for shading be very careful to not make the whole thing dark .Otherwise your lightest color wont stand out. For the dress i used Rv21, Rv32, and Rv34. Start with your lightest and follow the creases you made in the dress from the lineart. Also for the rullfes in the dress. I decided to use the same color from the flowers. Follow your light source and follow how u drew the folds in the lineart ^^
For the shawl, i watned it to look see through ish so i left some areas white. For where it goes over the skin leave some areas white so you can fill it in the color of the skin. So where it overlaps uset he same skin tones you used b4. For the white not over her skin, we'll be adding green later because of the background.
VIOLIN! okay since i'm a stupid person i drew the violin facing the wrong way.. but anwayz for the coloring i chose those two colors for the briggter part. Start with your lighter color after you sahde the whole thing go over certain areas you want darker with the same color then chose the next color to add more shadows. i dont know why but i didnt take a close up pic for the white parts of the voilin. those parts i chose a darker brown and did the same process as the lighter parts.
for the grass i just did a stippling effect. just a gagillion dots. but make sure to use shading with darker colors as well..
for the tree i did the same stippling as the grass. i used the same colors from the dress for the tree. for the sky i kinda did streaks of blue back and forth and left some areas white for clouds.
so now thast where we are :3. i still have to talk about how i did the water, but u can see i added green dots in the shawl and the darker browns in the violin. i still have to do the skin in the legs and eyes.. etc..
so i will contintue the tutorial in another submission once i upload the images i took :3
i hope this was helpful :3
~rachel
EDIT: OBVIOUSLY FULL VIEW LOL


